Installing or replacing bearings is one of the most common chores of the average maintenance department. Whether it’s replacing overheated motor bearings or installing tapered bore roller bearings on a fan, using the correct procedures and tools makes all the difference when it comes to the lifespan and efficiency of the machine and its components. The following list of key installation procedures and tips will help your business to #keepitrunning.
- First things first! Know what type of bearings you need for your specific application. Determine the load, speed, temperature, lubricant requirements and any other operating conditions that may affect what type of bearing should be used. Many manufacturers will have engineering software tools available at no cost to help you select what’s best for your application.
- Use emery cloth to remove all burrs, rust, etc. from the shaft surface. Clean off all dirt and grease using brake cleaner or a similar solvent.
- Check the shaft for proper fit by using micrometers to measure the shaft diameter where the bearing will be seated. If the shaft is undersized, make a proper shaft repair, refit the bearings to new locations on the shaft, or replace the shaft altogether. Also, check shaft for runout before installation. There is no sense in installing new bearings on a bent shaft!
- You can lightly lubricate the shaft to slide insert bearings (set screw; eccentric lock) onto the shaft if needed. Lubricant should NEVER be used with tapered bore/interference fit bearings.
- Indicate bearings to ensure that your bearings sit square relative to the shaft centerline and/or housings. This prevents a potential pre-loaded condition that will reduce the internal clearance and cause overheating and excessive wear. With common insert bearings where set screws or eccentric collar locks are used to mount the bearings, the best practice for indicating bearings is to attempt to slide the shaft back and forth through the bearings as they will be positioned on the base. This is done before the bearings have been mounted to the shaft. The shaft should slide through the bearings relatively easily, depending on the weight of the shaft and machine. For interference fit split block bearings, such as tapered bore bearings, used a dial indicator to check runout and adjust accordingly.
- Split block bearings will need to be greased. Pack rollers throughout and fill the bottom of the bearing housing with grease up to the bottom of the shaft. Use the grease most suitable for the application.
- Use proper torque values and/or procedures when tightening locking set screws and bearing housing bolts. Keep in mind, if you use Loctite or anti-seize on your bolts, reduce your torque to the wet torque specification for that fastener.
- Know whether your bearings are intended to be “fixed”/held bearings or floating bearings. You will set your floating bearing by checking the total amount of axial play along the shaft. Set your bearing in the center of the anticipated axial play to allow for expansion as the machine comes to operating temperature.
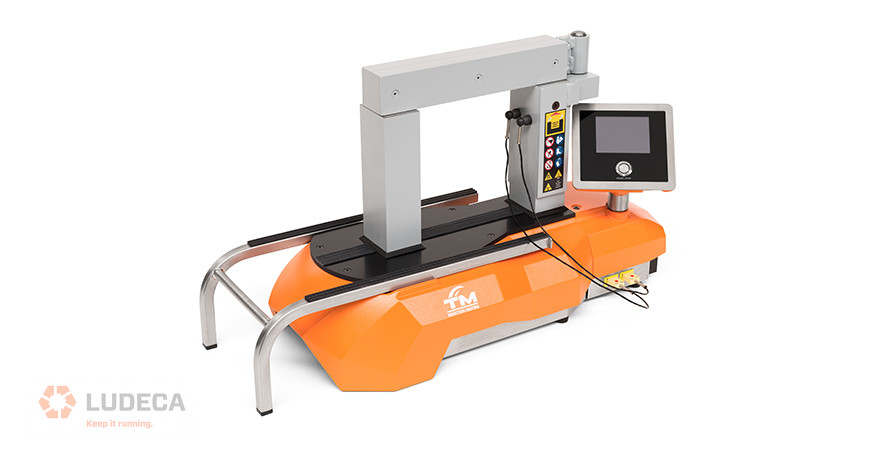
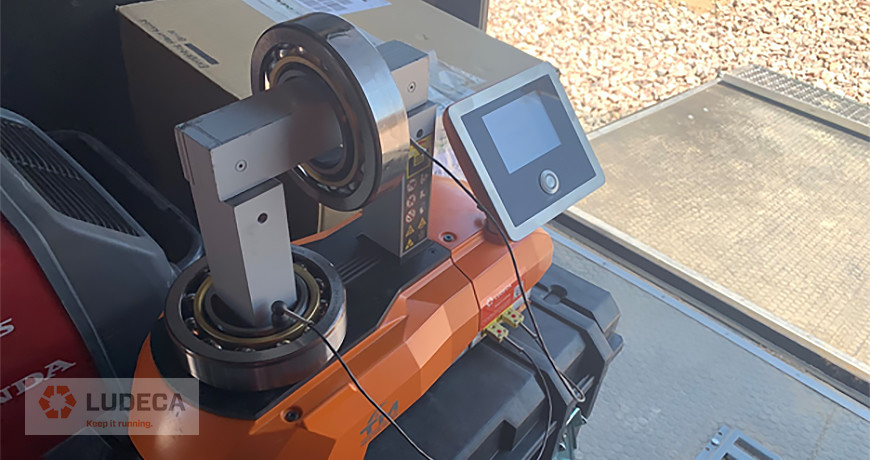
- Straight bore interference fit bearings should be installed using a SURETHERM® bearing heater for accuracy and efficiency. With multiple heating modes such as time mode, and temperature modes in one-sensor mode or two-sensor mode, these bearing heaters have the capability to address any scenario. The SURETHERM® bearing heaters heat your bearings evenly to the correct temperature every time, with no added stress to your bearings, and with an automatic demagnetization feature that keeps metal flakes and shavings out of your bearings.
Bearings are integral to our everyday operations. With attention to detail and the right tools for the job, you can dramatically increase the life span and reliability of your equipment. Do it right and #keepitrunning.
Download our Bearing Storage Best Practices infographic for some basics things to prevent bearing damage and contamination thus maximize bearing life and performance!
Case Study: Field Bearing Heating and Installation with SURETHERM 10X
by Diana Pereda
Uneven Heating = Distortion & Premature Failure
When heating is uneven, the Outer Diameter (OD) and Inner Diameter (ID) expand at different rates. This differential expansion can cause warping, ovality, improper shaft fit, increased vibration, and premature bearing failure.
Bearings must expand uniformly to slide onto the shaft without undue force. If the ID expands faster than the OD (or vice versa), internal stresses can occur, including crushing of rolling elements, pitting of inner and outer races, microfractures, and reduced service life.
Recommended Temperature Differential
- Ideal OD–ID difference: 18°–27°F (10°–15°C)
- Non-precision bearings: 27°–36°F (15°–20°C) maximum
Always consult the bearing manufacturer, as limits vary by bearing type.
Five Heating Methods & Their Pitfalls
1. Hot Plates
- Can develop hot spots.
- Require flipping the bearing for uniform heating.
- Uneven expansion risk.
- Requires additional PPE and presents burn hazards.
- Energy inefficient.
2. Ovens
- More uniform heating but slow.
- High energy consumption.
- Requires external temperature monitoring.
- Requires PPE.
- Heats entire bearing without selectivity.
3. Hot Oil Baths
- Fire and flash risk.
- Oil contamination of the bearing.
- Requires strict oil and bearing temperature control.
- Requires PPE.
- Environmental and housekeeping concerns.
4. Open Flame (Never Recommended)
- Creates severe hot spots.
- Can exceed allowable temperature limits.
- Causes metallurgical damage.
- Destroys seals.
- Leads to immediate or latent failure.
5. Brute Force Installation
- Causes nicks and burrs.
- Leads to brinelling and raceway damage.
- Crushes rolling elements.
- Reduces bearing precision and life.
Special Note: Sealed Bearings
Sealed bearings are especially vulnerable. Direct heat damages seals, oil bath immersion degrades seals, overheating causes seal hardening, and seal failure leads to contamination and grease loss.
Induction Heating – Preferred Method (With Conditions)
Induction heating is one of the safest and most controlled methods, if properly equipped.
Minimum Essential Requirements
- Temperature control
- Automatic demagnetizing cycle
Failure to demagnetize a bearing allows it to attract airborne metallic debris, leading to raceway damage and premature failure.
Ideal Setup: Dual Temperature Probes
Using two temperature probes (one on the ID and one on the OD) allows monitoring of differential expansion, prevents overheating, maintains allowable temperature change, and protects internal geometry during installation.
An induction bearing heater capable of monitoring both probes, controlling maximum temperature, controlling maximum OD–ID delta, and providing automatic demagnetizing after heating represents best practice.
Download our Induction Heating Procedure plus Bearing Mounting infographic for a simple and safe procedure for proper bearing installation using induction heating!
Comparing Hot Plate to Induction Heating for Proper Bearing Installation
by Diana Pereda
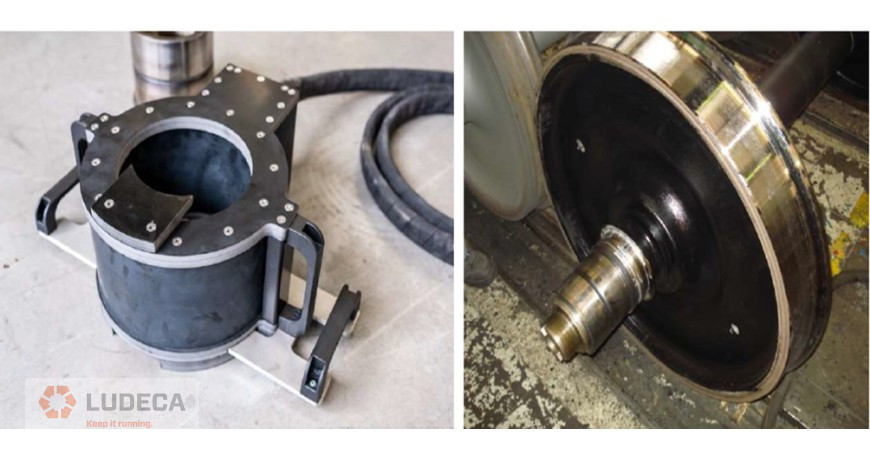
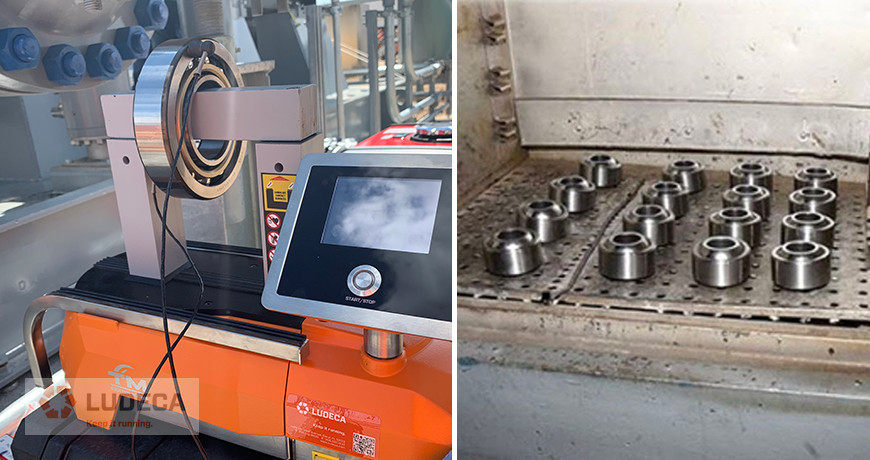
Before machining the wheels of rolling stock, the bearing inner rings (types NU and NUP) and the labyrinth rings must be dismantled. It is essential that these rings be removed without any mechanical or thermal damage to the parts so that they can be reused after the machining process. (A bearing inner ring is used as a raceway to provide a hardened and precisely machined surface for the rolling element, and a labyrinth ring is used to protect bearings from contamination and leakage.)
This can be safely achieved by induction heating. By sliding a medium-frequency induction coil over the installed inner ring or the labyrinth ring and connecting it to a medium-frequency generator (TM Induction model EHX-03A), the ring can be heated uniformly while the shaft is mounted to remain cool. The localized induction heating causes the ring to expand slightly, allowing it to be removed easily without force or damage. Because heating is confined to the ring, the shaft and adjacent components remain unaffected.
The induction coil assembly is lightweight and ergonomically designed, making it easy to handle during field or workshop operations. To perform this procedure, the EHX-03A generator is used in combination with one or more fixed inductors that are custom-built for the specific component geometry being heated. This ensures efficient energy transfer, controlled temperature rise, and repeatable, damage-free ring removal.
The alternatives to induction heating (pulling the rings off hydraulically by brute force) damages the rings, rendering them unsuitable for reuse and resulting in much higher repair expense.

Advantages (Compared to Traditional Methods)
- Lower repair cost: Save existing inner and labyrinth rings for reuse.
- Fast, Safe, and Controlled Operation: Focused induction heating enables rapid, even and precise temperature rise while maintaining full operational safety.
- High Energy Density and Efficiency: Concentrated heat application ensures minimal energy loss, providing an energy-efficient and environmentally friendly process.
- Customizable Solutions: Heating coils are specifically designed for individual components such as inner rings and labyrinth rings, ensuring optimal performance.
- Lightweight and Mobile System: The compact generator design allows for easy transport and use in various fields or workshop environments.
- Low Power Consumption, High Efficiency: Advanced induction technology minimizes electrical demand while maximizing thermal efficiency.
- Controlled Heating Process: Continuous temperature monitoring prevents overheating or component damage,
Watch the Mid Frequency Induction Heating video from TM Induction Heating for a demonstration of the bearing inner rings and labyrinth bearing being removed.
by Diana Pereda
We previously discussed, Common Bearing Failure Causes: Part 1 Contamination. In this blog, we discuss bearing failures caused by faulty installation.
Another common bearing failure is faulty installation. Bearings must be removed and reinstalled occasionally due to failure, or they must be removed to disassemble a piece of equipment for repair or maintenance. Bearings are designed to have a long service life; however, this service life is greatly affected by the installation and maintenance of the bearing. Here are some of the most common poor assembly and installation practices:
- Shaft and bearing fits are not within allowable limits.
- The housing is not rigid enough to support the load, causing the shaft to deflect.
- Housing bores are out-of-round.
- Housing and shaft shoulders are not square.
- Installed radial clearances are too low.
- Bearings are pinched when overtightening a split housing.
- Bearings mounted on tapered shafts or sleeves can be overloaded during mounting.
- Undersize shafts may permit the inner ring to slip or rotate on the shaft.
- Oversized housing bores may permit the outer ring to spin in the housing.
- Hammering on the bearings. This is an extremely poor practice. Use induction heating.
- Improper press methods during installation.
- Overheating the bearing for interference fits on the shaft. (Using an induction bearing heater instead of a blowtorch can keep this from happening.)
- Improper preload or end-play settings.

Download our Induction Heating Procedure plus Bearing Mounting to learn a simple and safe procedure for proper bearing installation using induction heating!
by Diana Pereda
- Make sure the surfaces of the vertical posts are clean.
- Improve the contact between the vertical post and the crossbar by applying a light coat of Vaseline or grease to the contact surface of the vertical post.
- The temperature probe should always be placed on or as close as possible to the inner race or ID of the workpiece being heated.
- When possible make sure a second probe is placed on the outer race or OD of the workpiece being heated to also track the temperature of the OD, in line with the ID probe.
- For the most efficient heating, always use the largest possible crossbar that will fit through the ID of the workpiece being heated. Stacking of multiple crossbars is permissible.
- It is not a requirement that the workpiece must touch the crossbar(s). Just so long as the bar goes through the bore (ID) someplace.
- Most important of all is that the workpiece being heated always be automatically demagnetized. Any induction heater that does not do this automatically COSTS you money instead of saving it.
by Bernd Seidenthal CRL
- Fast and Efficient Heating: Induction bearing heaters such as SURETHERM offer safe, rapid, and efficient heating, significantly reducing the time required to heat bearings compared with traditional methods. This efficiency enhances productivity by minimizing downtime during installation or replacement procedures.
- Precise Temperature Control: Induction heating provides precise temperature control, ensuring that bearings are heated uniformly and accurately. This is crucial for preventing overheating or uneven expansion and preventing structural stresses in the bearing that can lead to damage or compromised performance of the bearing. Precision heating is accomplished by using two temperature probes to ensure both the inner diameter (ID) and outer diameter (OD) heat evenly.
- Consistent and Uniform Heating: Induction bearing heaters deliver uniform heating across the entire bearing, avoiding localized hotspots. As mentioned above, uniformity in heating is essential for achieving stress-free expansion and fit during installation or removal, promoting the longevity and reliability of the bearing.
- Safety and Cleanliness: Induction heating is a clean and safe method that doesn’t involve open flames, hot surfaces, or direct contact with heating elements. This eliminates the risk of burns and workplace hazards, providing a safer environment for maintenance personnel. Regardless of the heating method, proper Personal Protective Equipment (PPE) is always required when dealing with hot bearings.
- Versatility and Adaptability: Induction heaters for bearings are versatile tools suitable for various bearing sizes and types as well as other workpieces such as gearwheels, pulleys, couplings, and bushings. Their adaptability makes them valuable for a wide range of industries, accommodating diverse heating applications. The flexibility of induction heating technology allows for efficient heating of different workpiece materials and geometries, making it a versatile solution for maintenance tasks.
Download Basics of Induction Heating to learn the basic principle behind induction heating, the diverse range of applications and advantages, and the different types of equipment you can use to reach your goals.
by Ana Maria Delgado, CRL
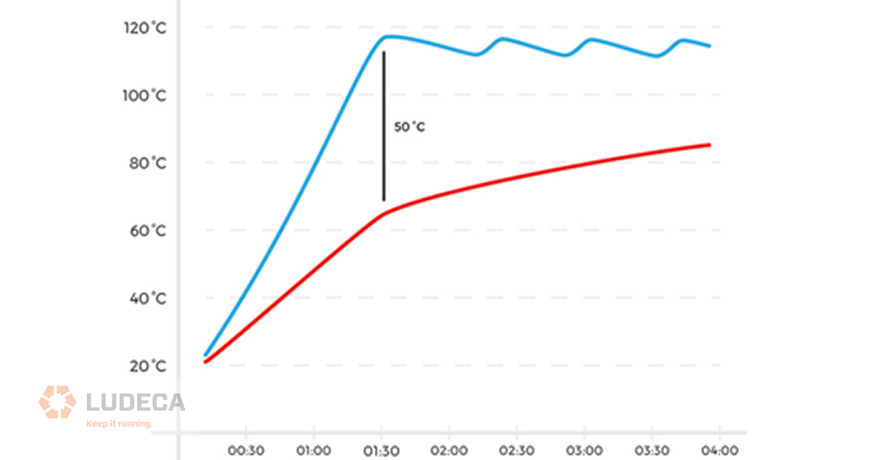
Traditional induction heaters only offer one temperature probe, to monitor the temperature of the inner diameter (ID) of the bearing being heated, assuming that both the inner diameter (ID) and outer diameter (OD) will heat evenly. However, the ID heats faster than the OD, potentially causing stresses between the ID, OD, and the rolling elements. This stress can lead to cracks, fractures, pitting, and deformation of the rolling elements, which can reduce the lifespan of the item being heated. These issues can go undetected, especially in high-precision bearings, where tolerances between the rolling elements and the ID/OD are tight. Even with sprockets and gears, the stress between the ID and OD can produce cracks and fractures in the membrane between them.
Figure 1 – illustrates how the ID heats faster than the OD when a single probe is used. The blue line is the ID and is measured by the temperature probe.
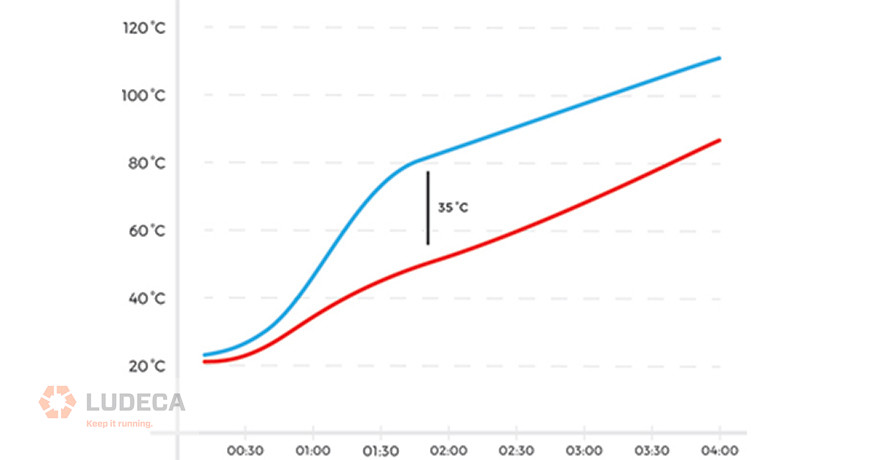
Using a single temperature probe, preventing these issues would be nearly impossible. Therefore, the solution is to use two temperature probes, with one measuring the temperature of the ID and the other measuring the temperature of the OD, simultaneously. The induction heater must be smart enough to adjust the heating cycle when the temperature differential threshold is reached, which is the maximum allowable difference between the IDs and ODs temperatures. This ensures that the desired temperature is eventually reached at the ID while preventing the max difference from being breached, thereby protecting the structural integrity of the workpiece.
Figure 2 – shows how monitoring both the ID (Blue line) and OD (Red line) temperatures together allows more even heating to be achieved.
In conclusion, not all applications require the use of two temperature probes. However, when it comes to preventing harmful stresses created during the heating of a bearing, it is essential. Having an induction heater that possesses this capability to reduce stress on your bearings and other workpieces is crucial. It not only improves the lifespan of the items being heated but also ensures better performance and safety of the assets that these components are mounted in.
Download our Basics of Induction Heating white paper to learn the basic principle behind induction heating, the diverse range of applications and advantages, and the different types of equipment you can use to reach your goals.
by Diana Pereda
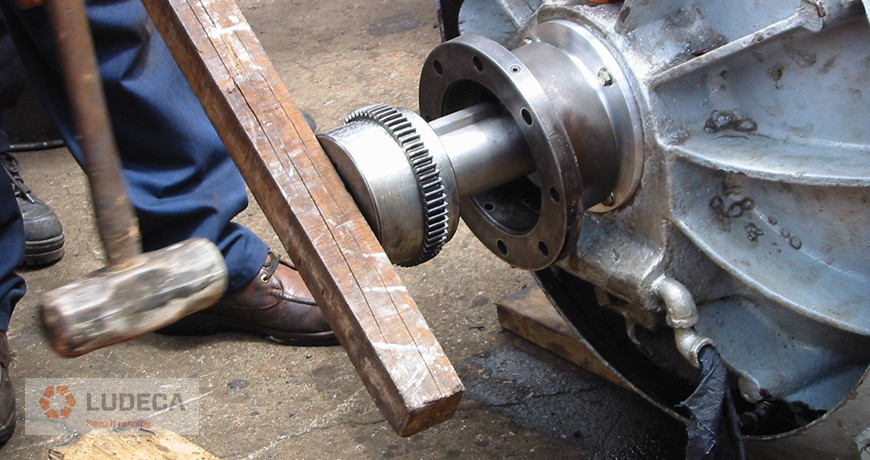
It seems that every maintenance department has at least one Hercules that uses more muscle than technique to complete maintenance activities. Brute force and strength are occasionally required to complete a task. Having Hercules around is important when those moments arise.
However, applying care and good technique are usually better. Over 90% of rotating equipment has defects at startup that result in equipment failure. One of the reasons arises from making bearing installation a herculean task and not using proper technique. Excessive force applied during bearing installation can introduce defects that lead to premature equipment failure. Instead of beating the bearing on with a sledgehammer, gently heat it up on an induction heater, automatically demagnetize it, and then slip it on. If Hercules did the job, then the bearing and equipment are doomed to failure from the moment of startup. This results in increased maintenance costs, increased risks, and increased equipment downtime.
Installing equipment bearings should not be a herculean task. Instead, proper technique and best practice should be applied to correctly install bearings. Induction bearing heaters like SURETHERM can help eliminate induced bearing defects due to poor fitting and improper mounting techniques. Induction bearing heaters provide increased safety, increased efficiency and reduce the risk of bearing contamination and damage that can result from using brute strength, oil baths, blowtorches, or other improper methods to heat bearings for proper installation.
Related Blog: Induction Heating vs. Conventional Methods to Properly Mount Bearings and other Workpieces
by Diana Pereda
The importance of having two temperature probes is to continuously monitor both the temperature of the inner and outer bearing races throughout the entire warming process of a bearing. By doing this you mitigate possible workpiece damage due to stresses caused by the temperature differential between the ID and OD.
Most induction heaters only monitor the temperature of the inner race, neglecting the temperature of the outer race. The problem with this is that the two races will not expand at the same rate (see fig. 1). If the ID heats faster than the OD, it will create large stresses on the roller elements that get sandwiched between the inner and outer races. These stresses will create cracks, fractures, and/or pitting that may not be noticed, reducing the life span of the bearing. This also holds true for gears, as the membrane between the ID and OD will also be stressed and this may create cracks lead to fractures.
In response to an increasing demand for reliability and quality, we not only monitor the ID but also the OD’s temperatures, and the SURETHERM heater compensates with corresponding power cycle adjustments to maintain an optimal expansion ratio. This is critical for high precision bearings that have a much tighter clearance tolerances.
In order to satisfy QA/QC documentation requirements for the proper heating of a bearing, it would be necessary to have a graphing capability: a graph that will show both the temperature of the ID and OD over the time that it took the bearing to reach the desired preset temperature and the deviation between the two temperature curves in order to document that the two did not deviate from the maximum permissible difference entered between the ID and OD temperatures. In addition, the induction heater should also have the capability to export and print the graph.
Finally, the last capability should be a safety feature that allows the user to set a delay once the start button is pressed, in order to protect users with medical conditions such as heart pacemakers and other implants.
Download our Basics of Induction Heating white paper to learn the basic principle behind induction heating, the diverse range of applications and advantages, and the different types of equipment you can use to reach your goals.
by Diana Pereda
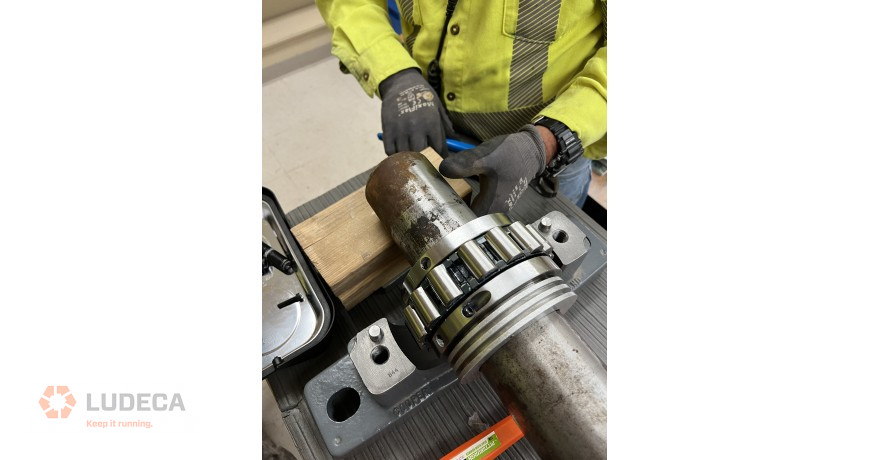
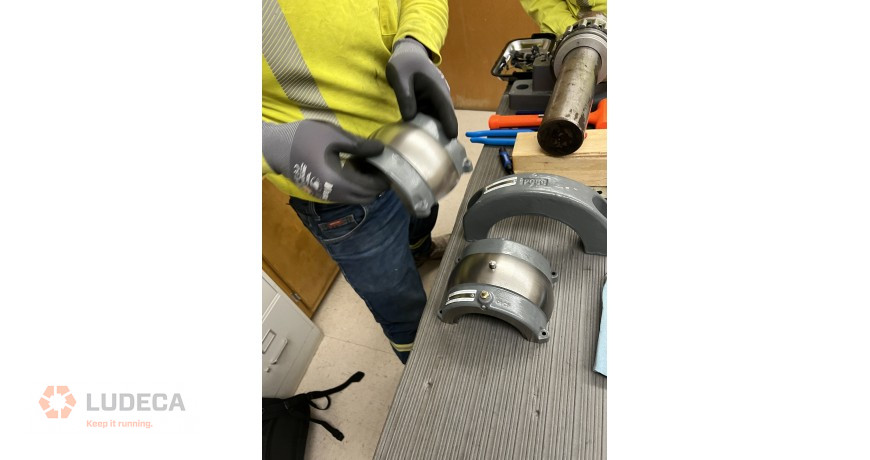
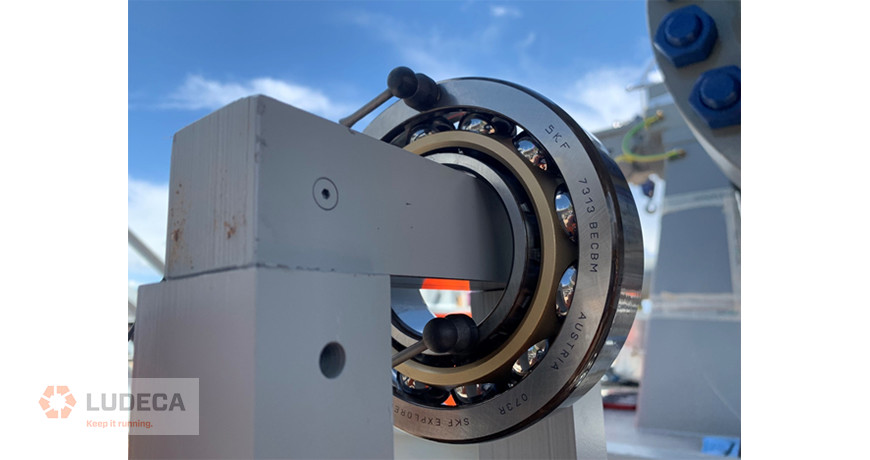
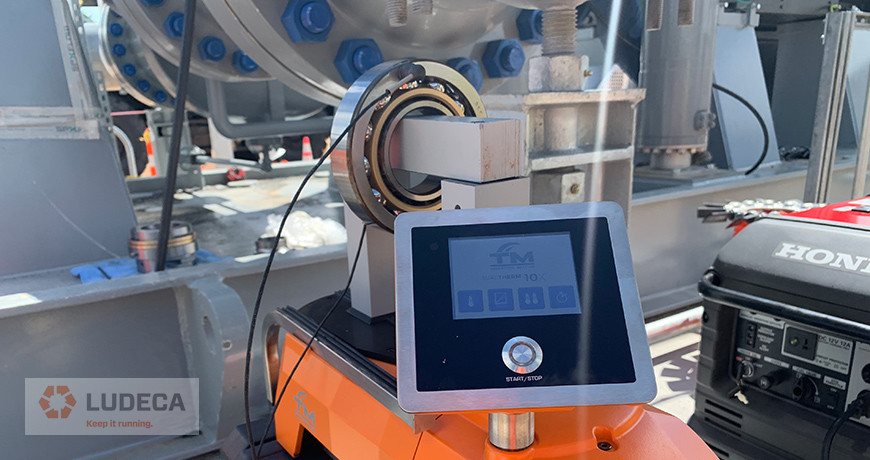
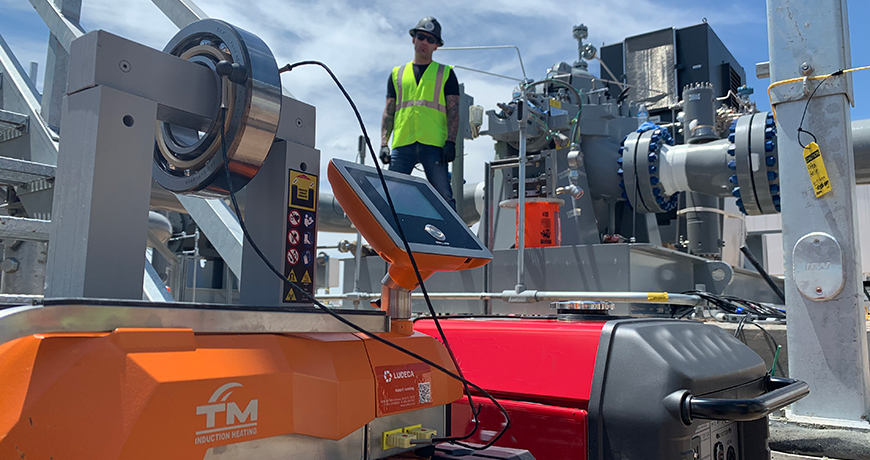
In 2019, JetTech Mechanical LLC was hired to perform maintenance for NGL Pipeline in Colorado. They serviced several SPX Clyde Union Pumps, BB3-D12X12X17W 2 stage 3250 HP, and 3775 RPM, pumping at 7525 US GPM 2000 Ft of Head. Part of the service was to remove and replace the pump’s opposite drive end thrust bearings. The bearings were SKF 7313BECBMs, the installation was back-to-back. To remove the bearings, two jaw pullers were used, and to replace the bearings a SURETHERM 10X induction heater with two temperature probes was used to precisely heat and demagnetize the bearings for installation.
Previously a different portable induction heater had been used, but it took much too long, the heater itself got hot and it only had one temperature probe. The great advantage of the SURETHERM bearing heater is that the twin temperature probes let you precisely monitor the difference between the inner and outer race temperatures and keep that differential to a minimum in order to prevent stressing the bearing.
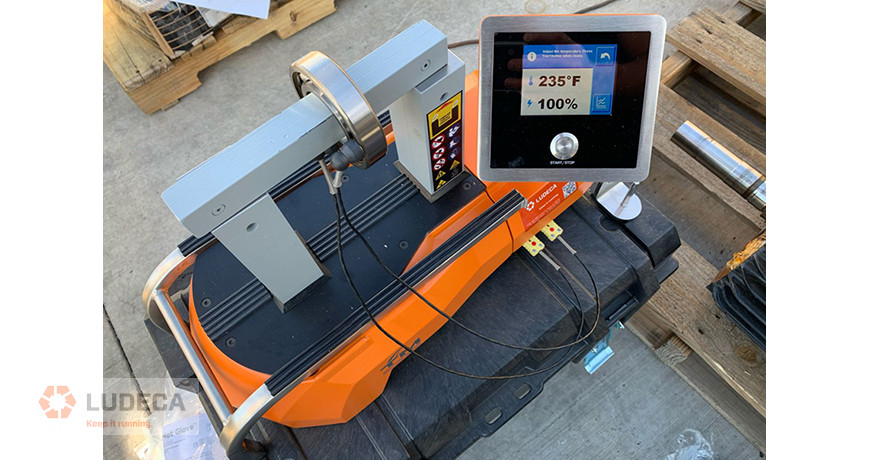
On the first install, the bearings were heated to 225 degrees Fahrenheit; this took approximately 2 minutes from ambient. The largest possible crossbar that fit the bearing ID was used. One bearing at a time was heated and installed within 6 minutes. No appreciable temperature difference was observed in this case, which gave rise to the greater efficiency experiment we tried next.
The experiment was to see whether on the second installation two bearings could be heated at the same time, placing one bearing around the post and the other on the crossbar, with one probe per bearing. Once again the induction heater worked flawlessly, heating both bearings within 2 ½ minutes and both to the same temperature, 225 degrees Fahrenheit.
This proved to everybody’s satisfaction the full capacity of the SURETHERM induction heater and its efficiency to heat evenly.
The customer’s conclusion was that the SURETHERM is a lot more efficient than any other induction heater they have used in the past. The fact that the Suretherm uses 2 probes, gives them the confidence that the difference in temperature between the OD and ID can easily be monitored making it safe and precise to heat bearings.
They also discovered that they can heat two bearings at the same time, and having the two temperature probe capability allows them to monitor the temperature of both bearings. Even though it is recommended that only one bearing at a time should be heated.
Thank you Brian Franks with JetTech Mechanical LLC for sharing this case study experience with us!
Download our Induction Heating Procedure – Bearing Mounting to learn more about how you can install your bearings properly in a simple and safe way.
by Diana Pereda
AUGUST 2020 – PUMPS AND SYSTEMS
Improper bearing installation is a common cause of bearing failure. If a bearing is damaged during installation, no amount of lubrication or alignment will save that bearing. At best, it will only prolong its inevitable premature failure.
Poor bearing installation starts with poor bearing storage. It is important to ensure that bearings are kept in an area with constant temperature and humidity, making sure the oldest bearings are used first, keeping the bearings in their protective packaging, and laying them flat as opposed to hanging them. Make sure the environment is vibration-free and clean, in order to prevent particle ingress contamination. One big problem with poor bearing installation is the method that is used to install the bearings. This also holds true for gears, hubs, rings, and any other workpiece that needs to be heated to be mounted on a shaft.
Download our Bearing Storage Best Practices for some basics things to prevent bearing damage and contamination thus maximize bearing life and performance.
Other problems are selecting the correct bearing, measuring to confirm that the interference fit is correct, making sure to clean the shaft on which the bearing will be placed, and not contaminating the bearing during handling.
Another problem is overheating. It is imperative to maintain an even temperature throughout the bearing while installing it and make sure never to exceed 250 F (121 C.)
Once the correct bearing has been selected, it has been measured to confirm the selection, and the shaft is free of contaminants and burrs, now comes the selection of the method used to mount the bearing. The selection can either give the bearing a long, healthy life or condemn it to death before it rotates even once.
There are several methods that can be used to heat a bearing for installation:
- Blow torch
- Brute force (sledgehammer)
- Oil bath
- Hot plate
- Cone heater
- Oven
- Induction heater
Click here to read the entire article, “Avoid Poor Bearing Storage & Installation” to find out more about the methods along with the pros and cons used to heat a bearing for installation.
Download our Induction Heating Procedure – Bearing Mounting for a simple and safe procedure for proper bearing installation.
by Diana Pereda
In order to heat a bearing for proper bearing installation, you can use multiple methods. In this case, I will compare using an Oven to using an Induction Heater.
Ovens come in different shapes and sizes but in essence, it is what we know an oven to be, you will place a bearing into the oven and bake it (heat it).
Using proper protection is essential in using an oven as not only the inside of the oven will be very hot but in all likelihood the outside as well and since some ovens can be quite large, regular gloves will not be sufficient. It is also very important that the surface onto which the bearing will be placed in the oven is clean so as to not contaminate the bearing that will be heated.
Monitoring of the temperature is imperative to make sure that you do not overheat the bearing. Most ovens have temperature controls that allow you to do that. It is not necessary to wait for the oven to reach the desired temperature in order to place the bearing or bearings in it. It is important to make sure that not only has the oven reach the desired temperature but also the bearing, it does take the bearing some time to be at the same temperature as the oven, using an external device might be necessary. Unlike the hotplate with an oven the bearings do not have to be turned over to heat both sides, so the heating should be even across the bearing.
Once the bearing is ready, make sure to wear your Personal Protective Equipment (PPE) while handling the bearing and being near the hot oven.
Sealed or pre-lubricated bearings should not be heated in an oven as both the seal and the lubricant may be compromised.
In comparison, if an Induction Heater is used, make sure that you are using the correct Induction Heater based on the weight of the bearing, and also make sure that you are using the largest possible yoke (crossbar) for the ID of the bearing being heated. Also, make sure gloves are used to handle the bearing after the heating cycle is completed.
Place the bearing with either the horizontal yoke (crossbar) going through the bore or one of the vertical posts, going through the bore. Set the desired temperature on the Induction Heater, using the control panel, make sure to place the temperature probe on the I.D. (inner bore diameter) of the bearing, not on the O.D. (outer bore diameter)*. Once you have selected the temperature to which you wish to heat the bearing (not to exceed 250˚ F) and press Start to begin the heating cycle. Once the heating cycle is completed and the bearing has automatically been demagnetized **, place the bearing on the shaft. (Remember to never spin the bearing while hot).
Comparison between an oven and induction heater when heating bearings
While ovens can be used relatively acceptably for batch heating of small bearings, their use for heating larger bearings generally will be inefficient and time-consuming, as well as adding to potential handling hazards for operators. Even for smaller bearings, the power consumption of the ovens is great, worst if it is used intermittently and needs to stay on for the next use in order to avoid having to start from scratch. The burn hazard is also greater as the user will have to reach into the oven to remove a bearing and not knowing if the bearing is actually at the oven’s temperature at any given time is also not reassuring. In comparison, with an Induction Heater you always know the temperature of the I.D. of the bearing, the efficiency and power consumption is much better since the Induction Heater is only on when heating and the burn hazard is reduced as the only thing that is hot is the bearing, so as long as the user uses his/her PPE they will be safe.
*Note: The best Induction Heaters actually offer two temperature probes so that you can mount the probes on both the inner and outer diameters of the bearing, and automatically modulates the heating cycles to monitor the differences between these (a best practice) so as not to stress your bearing, a particularly valuable feature for expensive or high precision bearings. Always try to use one of these types of Induction Heaters is possible.
**Note: Never use an Induction Heater that does not automatically demagnetize your bearing after the heating cycle is completed.
For more information, download our Induction Heating Procedure Bearing Mounting a simple and safe way to properly install your bearings. Mount your bearings quick, clean, and easy thus increase the life of your bearings!
by Diana Pereda
For many years, applying heat was explained as simply just that, applying heat. How it was done was usually left totally up to interpretation. In a field application, this could be left to the discretion of the crew doing the job, based on either what was available or considered most effective/least expensive/easiest. Any one of these criteria could doom a piece of equipment to an early demise. The same holds true for a shop application, where it is assumed that resources and tools are much more readily available. In either setting, a little information about how the equipment and parts are designed to work can shed a ton of light on how heat should be properly applied.
For an installation of, say, a coupling hub to a shaft, there is always a specification given for what the hub bore should be to fit a certain sized shaft and these dimensions should be checked first. Over-heating a hub to make it go over a shaft that is just a hair over-specified will not work. This will end up possibly damaging the hub through distortion and even weakening the structure (not what you want in a hub that could be transmitting thousands of horsepower.)
Most coupling manufacturers have a specification that pertains directly to the product they are selling for specific applications, but here are some guidelines.
Straight Bore – Interference fit with keyways:
Shaft Diameter (in.) Interference Fit (in.)
.5″ to 2″ 0.0005″ to 0.0015″
2″ to 6″ 0.0005″ to 0.0020″
6″ and up 0.0001″ to 0.00035″
Splined Shaft – Slight Interference fit
0.0005″ To prevent backlash or fretting of the hub
Tapered Bore – for high speeds and high torque
Interference fit of 0.001″ per 1″ of shaft diameter
With tolerances like this, betting that a little extra heat will get a job out of a bind just does not make sense. Knowing these tolerance values up front lets the technician know that a few measurements will go far towards making sure the work goes as planned. Accurate measurements of the ID for the hub and OD for the shaft will show if the diameters are right for the installation. Once that is established, the phase of applying the heat can begin! So how is it to be done…..?
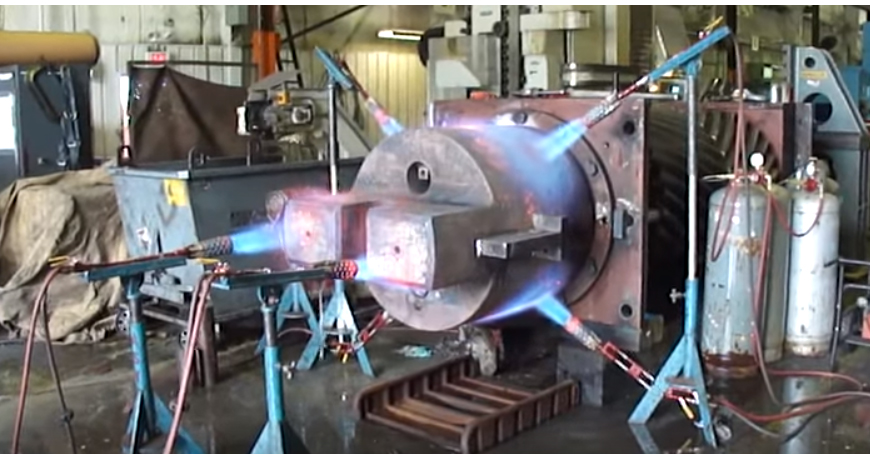
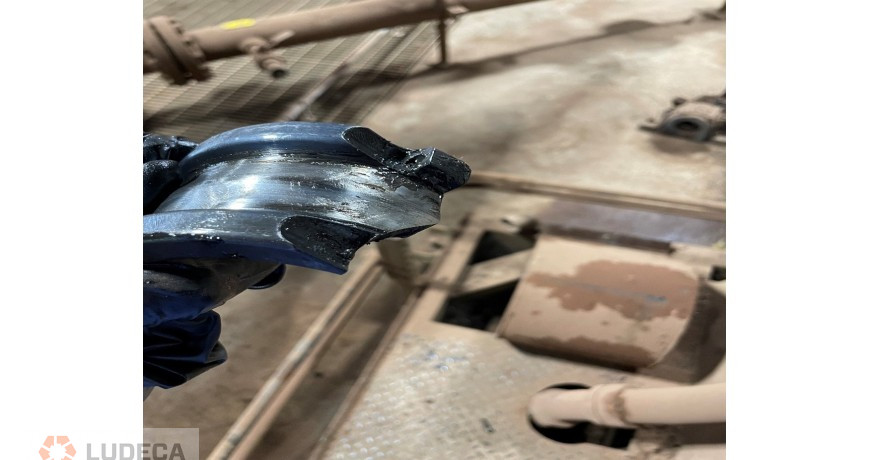
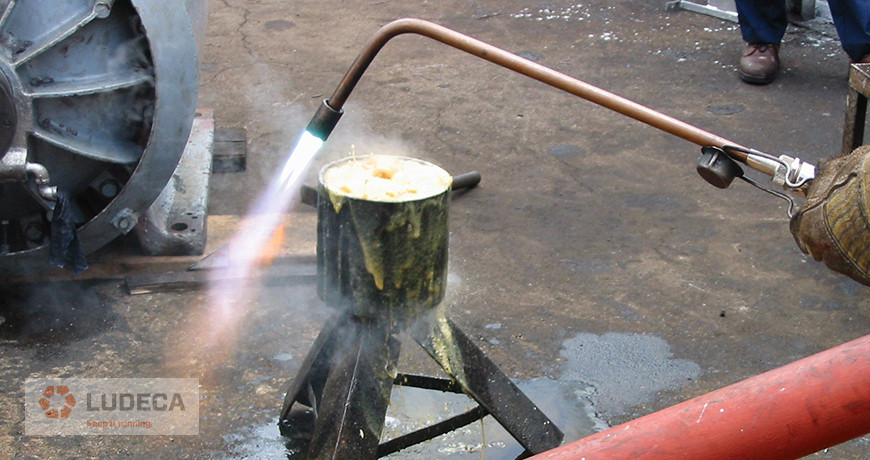
Does anyone have a clue as to how hot this is getting? It is an impressive collection of rosebud torches, and it appears that they are all heating the material, but clearly, hotspots can be seen. Even the manufacturer has notes about this.
“The hub may have to be heated in order to reach the desired position on the shaft. DO NOT SPOT HEAT THE HUB OR DISTORTION MAY OCCUR. Install shaft locknut to hold hub in place”
Maybe the results of work performed like this have been observed in the past. Did the equipment run efficiently? Did it exhibit vibration? Did it even make it to the first service interval?
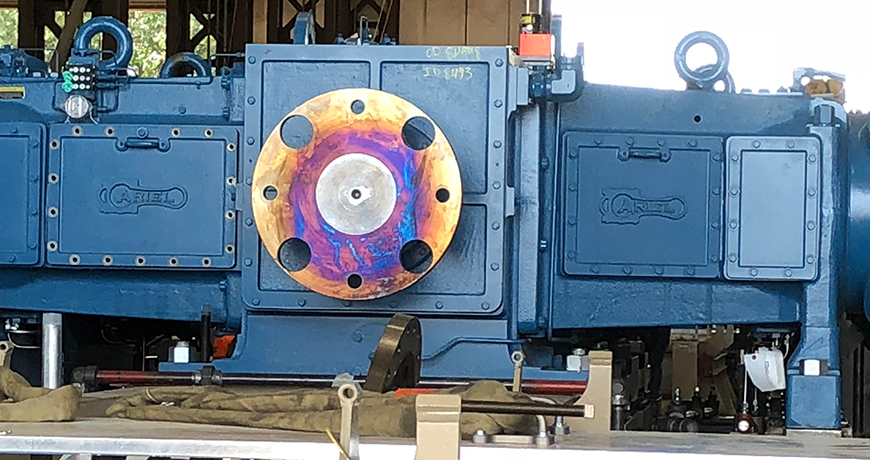
Knowing that this hub had “heat applied” to the point that it is permanently discolored the metal could help explain runout issues when trying to align this hub to the driving shaft. And even if the alignment can be done within tolerance, what forces will the bearings see? And what is happening to clearance for the shaft? Oil analysis might even start giving clues right away that there is a problem.
Proper application of heat with an induction heater eliminates all of the issues talked about so far. The induction heater guarantees that heat is evenly and accurately applied to the workpiece and that the workpiece is fully demagnetized before installation. If the technician has measured the bore and the shaft, cleaned everything properly for installation and used an induction heater to achieve the proper temperature, this job should go off without a hitch. Furthermore, there should be a report that showed how the hub was heated, over what span of time, and to what specified temperature. This eliminates a large amount of investigation (and possibly blame) in the event that a Failure Analysis investigation needs to be conducted.
Download our Basics of Induction Heating white paper and learn the basic principle behind induction heating, the diverse range of applications and advantages, and the different types of equipment you can use to reach your goals.
by Diana Pereda
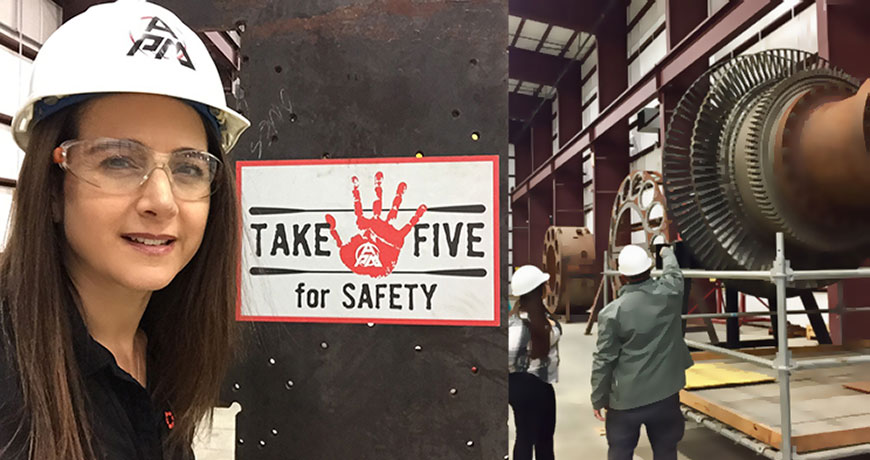
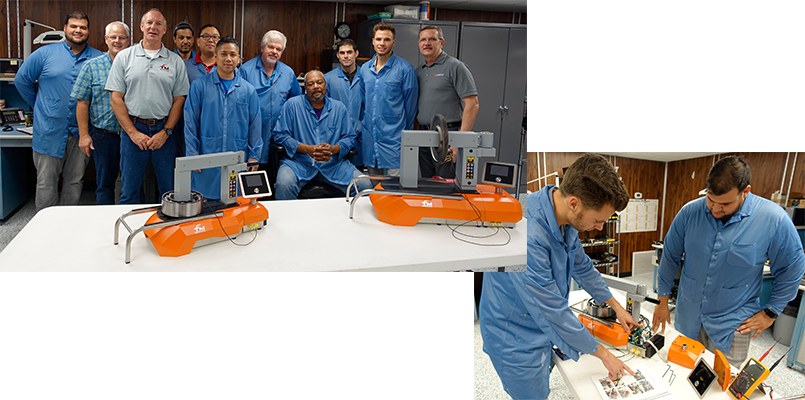
Once again, I was struck by a smart sign that reminded me of the importance of safety: “TAKE FIVE for SAFETY.” This one popped up while touring the APM Training and Development Center in Houston, Texas after our #NoExcuses for Equipment and Bearing Failures workshop.
It was the perfect closing theme to a day of learning how planned and precision maintenance practices, along with step-by-step procedures, not only reduce equipment failures but, most importantly, move us away from rushed reactive work that increases the risk of personal injury.
We had started our learning day taking five minutes to review safety procedures in the building. Later during the tour of the amazing APM training facilities, we had taken five to put on our personal protective equipment (PPE) to get near their mega GE turbines. Their commitment to safety at all times prompted me to share with you my five takeaways from our workshop for reliable work that will also deliver safety:
- Prepare and plan your work. This quote from President Lincoln reminds us of the importance of preparation to get the job done right:
Give me six hours to chop down a tree and I will spend the first four sharpening the axe.” ― Abraham Lincoln
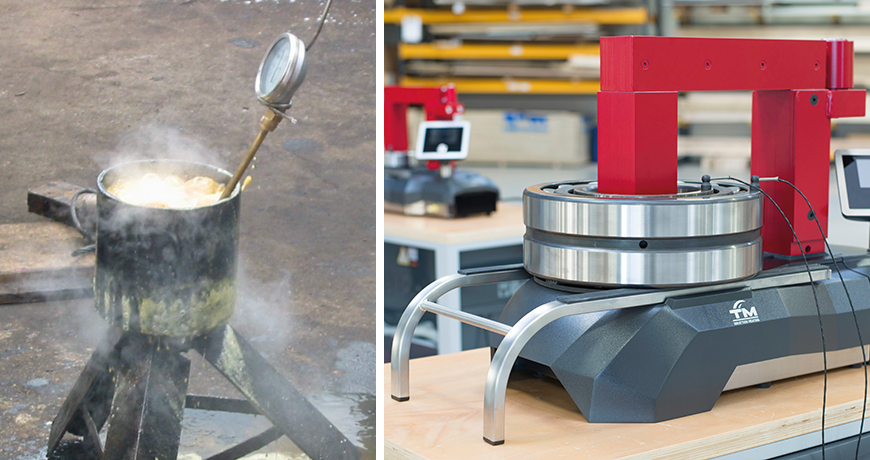
- Torches, rosebuds, and oil baths are not safe methods to heat your bearings, as they will almost surely result in burns and damage your bearings. Instead, consider heating your bearings and other workpieces using safe induction heating. It’s a clean, faster, and more accurate method, whether in the shop or in the field and best of all, safe!
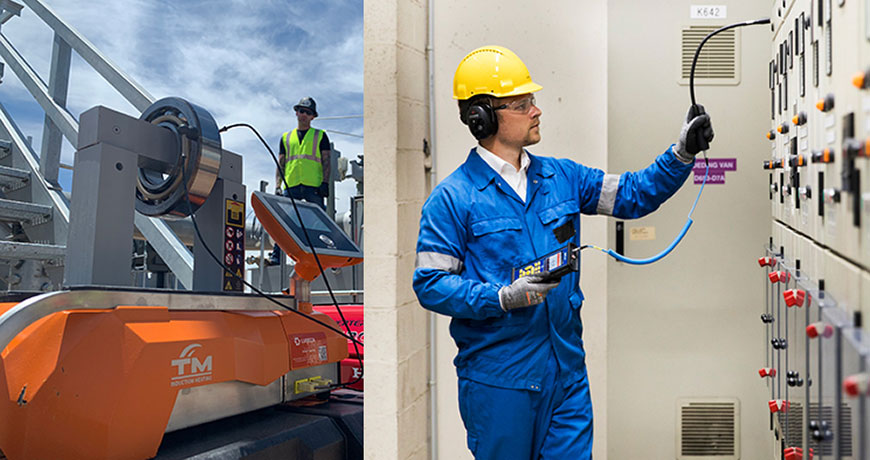
- Electrical faults are dangerous! Taking five to reduce personal injury by adding ultrasound to inspect your electrical systems for arcing, tracking and corona is the best work safety practice.
- Also, use ultrasound to detect dangerous leaks such as gas and ammonia before you step in there and breathe it in.
- Protect your assets, both people and equipment, by implementing the following five steps along with precision maintenance technologies:
- Stop and think about the potential dangers associated with the job.
- Look for and identify any hazards.
- Assess the risk; consider any possible risk of damage or injury.
- Control hazards by implementing suitable control measures to reduce the risk.
- Monitor hazards to successfully mitigate the likelihood of injuries or damages as you work.
Further, I found this information about “Take 5 for Safety” that you may find useful for your facility:
The above-listed Take 5 Safety checklist is a tool used to identify health and safety hazards before starting work at a site. Performing health and safety checks using the take 5 procedure (Stop, Look, Assess, Control, and Monitor) helps workers and contractors mitigate exposure to injury hazards and health risks.
Source: SafetyCulture
Click here if you missed and want to read my previous safety post: Heaven can wait! Safety first. Always lock-out and tag-out your machines.
by Ana Maria Delgado, CRL
Predictive maintenance plays a huge part in the overall reliability of your assets. Most of the time, equipment fails because of a bearing or seal failure. Bearing failures are very common, and improper installation of a bearing is one of the biggest reasons it fails. If you don’t do it right, and with the proper tools, you are going to damage the bearing and it is only a matter of when rather than how. Before installing a bearing, you need to have a clean space and all the necessary tools should be with you when you are installing it. You also have to make sure that the storage of the bearing is correct. There are a number of ways that you can go wrong with improper storage and handling of bearings.
Overheating is a huge issue that is often observed while installing a bearing. There are multiple ways to heat a bearing before installation. You can use an oven, or a hot oil bath where you dip the bearing in boiling oil and heat it until you hope you get the right bearing temperature. You can also use a hot plate where you need to keep flipping the bearing over and over to try to get an even temperature on both sides. Another, and by far the best method is to use an induction heater. These come in different sizes, to handle from the smallest to the largest bearings with ease. They use eddy current heating and the system monitors the precise temperature of the bearing for you until it reaches the desired temperature. You need to take proper safety measures in every case.
Induction heaters are also the most efficient in terms of power consumption and the time it takes to achieve the precise temperature that you need. Temperature is the key here and for bearings it should always fall between 220 and 230 degrees F, but never above 250 degrees. Induction heaters are also good for sealed bearings in that they don’t damage the seals or contaminate the new lubricant in the bearing while heating it. Then you have to make sure that the shaft is clean and not damaged. Sometimes, the shaft is compromised when a bearing is removed because brute force was used to remove it. You need to have the proper tools so that you will be able to remove the bearing without damaging the shaft or any other vital component of the machine. You should also make sure that you are installing the right bearing with right tolerances, at the right place and at the right temperature.
The person installing the bearing needs to have just basic training to install it properly, when using a good induction heater. They should know how to operate the induction heater, have knowledge of safety procedures, and proper installation techniques. You should trend this in your facility so that a culture shift toward continuous improvement in your procedures is maintained. The mindset of the personnel is very important here because they are the ones who will have to make these practices consistent with time. Proper bearing installation prevents a lot of failures and saves you lots of time and money in the end. Download our Induction Heating Procedure – A simple and safe procedure for proper bearing installation.
Hear more from Bernd Seidenthal in this podcast by James Kovacevic and learn more about how to avoid bearing failures and the necessary tools you need, the steps, and value of proper bearing installation.
by Diana Pereda
In order to heat a bearing for proper bearing installation, you can use multiple methods. In this case I will compare using a hot plate to using an Induction Heater.
Hot plates come in different shapes and sizes but in essence it is a plate that will heat up, and onto which a bearing will be placed in order to heat it.

Using proper protection is essential when using a hot plate as the surface will be very hot. It is important to ensure that the surface of the Hot plate is clean so as to not contaminate the bearing that will be heated.
Make sure to wear your Personal Protective Equipment (PPE) while handling the bearing and being near the surface of the hot plate. Careful monitoring of the temperature is imperative to make sure that you do not overheat the bearing. Set the temperature on the hot plate to the desired setting; once the hot plate reaches the desired temperature place the bearing on the hot plate and make sure you turn the bearing often so that both sides heat evenly. Use an external thermometer or temperature measurement device (thermometer, temperature sticks, infrared heat sensor) to make sure that the bearing reaches the required temperature to be fitted on the shaft. Again, make sure that both sides of the bearing have the same temperature.
Sealed Bearing should not be heated on a hot plate, as the seal will be compromised through direct contact with the hot plate surface.
In contrast with a hotplate, if an Induction Heater is used, make sure that you are using the correct size Induction Heater for the weight of the bearing, and also make sure that you are using the largest possible yoke (crossbar) for the I.D. of the baring being heated. Use appropriate gloves to handle the bearing after the heating cycle is complete.
Place the bearing with either the horizontal yoke (crossbar) going through the bore, or over one of the vertical posts going through the bore. Set the desired temperature (not to exceed 250° F) on the Induction Heater using its control panel, and place the temperature probe on the I.D. (inner bore diameter) of the bearing.* Now press start to begin the heating cycle. Once the heating cycle is completed and the bearing has automatically been demagnetized**, install the bearing on the shaft.
Comparison:
The Induction Heater has the advantage over the hot plate method. Several things stand out immediately, safety foremost among them, along with precise temperature monitoring and control. The hot plate method has some safety drawbacks such as a burn hazard, since ideally the hot plate needs to reach the desired temperature before placing the bearing on it, creating an area hazard. Also, having to constantly handle the bearing to make sure that both sides are heated equally increases the probability of dropping the bearing and poor temperature control of the bearing.
* Note: The best Induction Heaters actually offer two temperature probes so that you can mount the probes on both the Inner and outer diameters of the bearing, and modulate the heating cycles to monitor the difference between these (a Best Practice) so as not to stress your bearing, a particular valuable features for expensive or high precision bearings. Always try to use one of these types of Induction Heaters is possible.
** Never use an Induction Heater that does not fully and automatically demagnetize your bearing after the heating cycle is completed.
by Diana Pereda
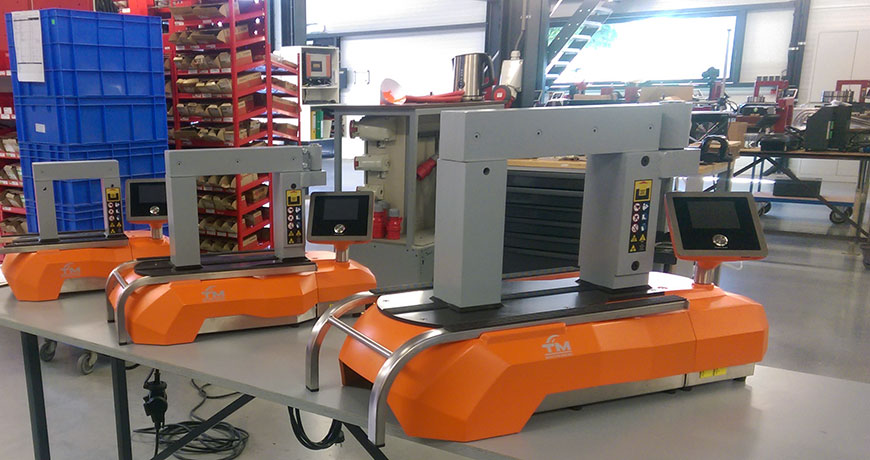
When looking for an induction heater, below are some recommendations to help with your buying decision:
- Size: Choose bearing heater based on maximum workpiece weight, or minimum inner (ID) and maximum outer (OD) diameter.
- Temperature control, single or dual: One temperature probe minimum, but two is ideal. To monitor the temperature of the bearing or workpiece a temperature sensor is required. For precision bearings, use an induction heater like the SURETHERM which features two temperature probes to accurately monitor the difference in temperature between the ID and the OD in order not to exceed the bearing’s maximum temperature differential requirements, thereby ensuring 100% tension-free heating.
- Automatic Demagnetizing: The process of induction heating magnetizes the bearing or workpiece, therefore an automatic demagnetizing cycle is essential in order to leave no residual magnetism that would cause debris to adhere and accumulate on the bearing.
- Multiple crossbars: Different workpieces have different ID sizes, so having the proper size yoke or crossbar is necessary for efficient heating of the workpiece. Always choose the largest crossbar that will fit through the bore of your workpiece.
- Automatic temperature hold-mode: Holding the desired temperature when reached is essential since you are not always ready to install the bearing when the heating cycle has concluded. Let the bearing wait on the person, and not the person on the bearing.
- Timed heating mode: If heating identical bearings one after the other in a production environment, timed mode will be faster and more efficient than temperature mode.
- Delayed start time (safety): Allows the user enough time to step back from the heater before it starts heating, in case the user has a pacemaker.
- Fail-Safe error warning: If the probe was not placed on the bearing, or falls off during the heating cycle, the heater will automatically stop in order not to overheat the bearing (if the heater is operated in either of the temperature modes).
- Reporting, graphing of time/temperature cycle and printing capabilities: For ISO 9000 compliance, a documentation capability to report how bearing was heated and how long it took and to which temperature the bearing it was heated would be ideal.
- Display temperature in degrees C or F on demand.
by Diana Pereda
In order to heat a bearing for proper bearing installation, you can use multiple methods. In this case I will compare using an Oil Bath Heater to using an Induction Heater.
In an Oil Bath Heater you need a container which will be filled with oil and heated in order to place a bearing in the hot oil to heat the bearing.
Using proper protection is essential in using Oil Baths; you also need to be absolute certain that the container and the oil within is clean. If the oil was previously used then that oil must be filtered to remove contaminants.
Monitoring of the temperature is imperative, not only to make sure that you do not overheat the bearing but also that you do not reach the oil’s flash point and create a fire hazard. You also need to make sure that there is enough oil in the container to cover the volume of the bearing. This will allow the bearing to reach the temperature of the oil and sufficient time needs to be alotted for this to take place.
Once the bearing has reached the desired temperature, absolute care needs to be taken with the excess oil that will be on the bearing—wearing your Personal Protective Equipment (PPE) is essential. If a pre-lubricated bearing was heated it is important to completely clean the bearing and new bearing lubrication be added.
In comparison, if an Induction Heater is used, make sure that you are using the correct induction heater based on the weight of the bearing, and also make sure that you are using the largest possible yoke or crossbar for the I.D. of the bearing being heated. Also make sure gloves are used to handle the bearing after the heating cycle is complete.
Place the bearing with either the horizontal yoke going through the bore or one of the vertical posts going through the bore. Set the desired temperature on the induction heater, make sure to place the temperature probe on the inner bore or ring of the bearing not on the outer diameter part.* Select the temperature to which you wish to heat the bearing (not to exceed 250° F) and press start to begin the heating cycle. Once the heating cycle is completed and the bearing has automatically been demagnetized** place the bearing on the shaft.
Comparison: The induction heater has the major advantage over the oil bath method. Several things stand out immediately, safety foremost among them, along with precise temperature monitoring and control. Safety-wise, the oil bath method has some serious drawbacks, chief among them the burn hazards to the operator, respiratory hazards and the possibility of flash fires. In addition, the possibility of contaminating the bearing and poor temperature control are other significant disadvantages compared to induction heating. The temperature is being set for the oil, it is difficult to gauge the temperature of the bearing as it is submerged in the oil.
*Note: Best induction heaters like our SURETHERM actually offer two temperature probes so that you can mount the probes on both the inner and outer diameters of the bearing, and modulate the heating cycles to monitor the difference between these (a Best Practice) so as not to stress your bearing, a particularly valuable feature for expensive or high precision bearings. Always try to use one of these types of induction heaters if possible.
** Never use an induction heater that does not automatically fully demagnetize your bearing after the heating cycle has completed.
by Ana Maria Delgado, CRL
Bearings are probably the more complex designed component of any rotating equipment; yet, they are the most misunderstood by the maintenance practitioners who handle them on a daily basis.” —Holcombe Baird, Reliability Center, Inc.
If experiencing premature bearing failures, you should not only look at bearing lubrication practices but also at bearing installation practices. When using an induction heater it is important to make sure that the heating is steady and even; fast is not always good, especially if you do not know what is happening with the temperature of the OD of your bearing. Remember that the inner race heats faster than the outer race. Precision bearings are prime candidates.
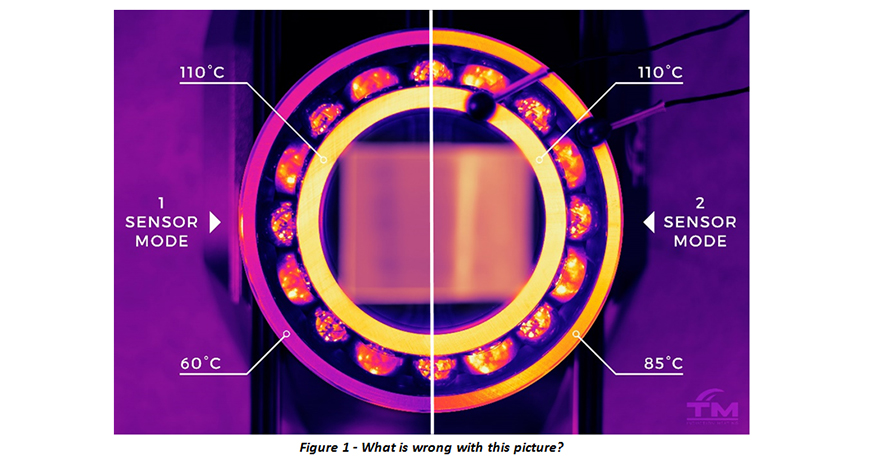
In the picture above, on the left, you see a single temperature probe, placed on the ID of the bearing, and by the time the temperature of the ID reaches 110° C, the temperature of the OD is only 60° C. This could be a huge problem if the clearance between the ball or roller bearings and the raceways of the ID and OD is not enough to handle the temperature difference. In these cases, the bearing balls or rollers get squeezed between the OD and ID damaging the bearing before it is even installed.
Read my entire article at Reliable Plant
Many thanks to Rick Trichka with TM Induction Heating and to Robert “Bob” Latino and Holcome Baird at Reliability Center, Inc. for their input.
by Ana Maria Delgado, CRL
LUDECA is proud to announce that effective October 20, 2017, LUDECA is certified as an authorized TM Induction Heating Service and Repair Center for the United States.
Our factory-trained technicians are highly experienced and committed to providing our customers with excellent service.
We look forward to servicing your TM Induction Heating products at our Doral, Florida location.
For more information, visit our website.
by Ana Maria Delgado, CRL