Belts are a critical part of the design and function of belt-driven equipment. The majority of belts never reach their intended design life due to improper selection, storage, and installation. Unfortunately, this results in compromised equipment operation, lost capacity, and increased costs. Do not condemn your equipment to death through improper belt installation practices. Below are some guidelines to help your facility ensure belt-driven equipment reliability:
- Follow all site-specific safety procedures.
- The same basic installation steps are required for both synchronous and V-belts.
- Loosen motor mounting bolts or adjustment screws.
- Move the motor until the belt to be replaced is slack and can be removed easily without prying or any other means of force. Prying off a belt or chain can damage a sheave or sprocket and increase the risk of injury. Never use a screwdriver to remove belts, because this may damage belt cords, sheaves, and sprockets.
- After removal, inspect the old belt for unusual wear that may indicate problems with design or maintenance issues.
- Visually inspect and replace sheaves or sprockets that have excessive wear, nicks, rust, pits, or are bent. Grooves that appear “shiny” or polished could indicate heavy wear and should not be ignored. Never sand or scrape groves. Doing so will insert points of wear leading to a premature belt or sheave failure.
- Sheave gauges should be used to measure for excessive wear and determine if sheave replacement is necessary. Total wear should not exceed 1/32 in or 0.8 mm.
- Sheaves and sprockets should be checked for proper alignment. A laser alignment tool is the recommended means. Most major belt manufacturers recommend a nominal tolerance of 0.5 degrees. However, better alignment tolerances should be achieved if possible. The table below can be used to determine proper alignment.
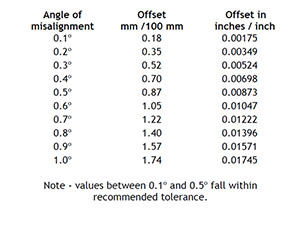 For maximum resolution, always mount the laser alignment tool on the smaller sheave and the targets on the larger sheave. Ensure that the alignment tool being used can indicate misalignment in all three degrees of freedom (axial offset, horizontal angularity, and twist angle).
Note 1: Check and correct any run-out conditions prior to belt installation. Tighten bolts in the proper sequence to prevent axial run-out.
Replace all belts on multiple belt drives with new belts from the same manufacturer. Never replace a single belt or a portion of a multiple belt drive. Mixing old and new belts will create unevenly shared loading and lead to premature belt failure and/or sheave wear.
- When installing the new belt, ensure that enough clearance is available to slip the new belt(s) over the sheave or sprocket. Never pry or use force to install the belt(s). Never use a screwdriver to roll belts into position, because this may damage belt cords, sheaves, and sprockets.
- Adjust the motor base until the belts are tight. The motor should be checked for soft foot conditions using a feeler gauge or other suitable means and corrections made if required. No reading of soft foot should be greater than 0.002 inches or 0.05 mm.
- Use a tension gauge or sonic tension meter until the correct tension is measured according to specifications.
- Rotate the belt drive by hand a few revolutions and re-check and adjust belt tension as necessary.
- Re-check the sheave or sprocket alignment and re-adjust if necessary.
- Secure motor mounting bolts to the correct torque specifications.
- Replace equipment guards and follow any other site-specific safety requirements to return the equipment to operation.
- Upon equipment startup, listen and visually inspect for any unusual vibration, noise, or heat. Other corrective actions may be required (lubrication, tension adjustment, etc.) to ensure equipment is ready for proper operation.
Note 2: Contact the belt manufacturer and provide the drive information to receive the most accurate tension information for the required operating loads. Belt tension charts may specify more tension than is required by the application. The proper tension for the belt is the minimum tension required to prevent the belt from slipping at maximum load. A good guideline in the absence of any other information is to use a spring scale and press down on the belt in the approximate center of its span (on the tight side), to deflect the belt 1/64″ per inch of span length and observe the force required to do so. If you are not sure of the belt span length you may also use the center-to-center distance of the pulleys, which will be similar. Tension the belts until the force required for this deflection equals the belt manufacturer’s maximum recommended force values for the specific belts you are using.
Note 3: Belts should not squeal on startup when adjusted to proper tension. This can be an indication that the drive is not proper for the application.
Note 4: A run-in procedure may be required for V-belt drives or other installations to ensure optimal belt life and equipment reliability. It is recommended to check and adjust belt tension under full load after 20 minutes, 24 hours, and 48 hours of operation to properly seat the belts in the sheave grooves. Consult belt manufacturer and engineering specifications to determine if a run-in period is required and the length of time.
Filed under:
Maintenance Tips, PDM, Reliability by Trent Phillips CRL CMRP - Novelis